Tuesday, October 19, 2010

Calendar Class at The Scrapbook Garden

Our second class for the day on Saturday, October 23rd from 2:00 PM - 5:00 PM at The Scrapbook Garden is a calendar class.  The cost is $35.

You will create a fat and chunky "family" calendar that you can scan and print for all your family members in time for Christmas or just keep for yourself. I choose to merge my family with my husband's family. I include a photo of each family member for their birthday month and then for their anniversary as well. I then use colored pencils (which is included in this kit) to highlight the date of their birthday / anniversary. This way my family keeps up with my husband's family (and vice versa) each year. This has become a family tradition each year and when we are together during the year, you hear comments like "this photo would be great for the calendar" or "I'd better not see that photo in the calendar". So start your own tradition and come create a calendar that you can save as a scrapbook after the year is over. You'll have 12 great layouts to put into an album at the end of the year. And as always, Amy & I will have plenty of sugar to keep you going while creating.


Although the sample shows 2009, the numbers are cut for 2011.
In addition to your normal tool box, you'll need:
Pop dots
Glue dots
12" ruler
Dark brown ink - I used Colorbox Chalk Dark Brown
Brown ink - I used Colorbox Chalk Chestnut Roan
Red ink - I used Colorbox Chalk Warm Red
Blue ink - I used Colorbox Pigment Royal Blue
Black ink - I used Colorbox Pigment Charcoal
White pen - I used Ranger Inkssentials
Brown pen - I used American Crafts precision pen #05 in brown
Black journaling pen - I used American Crafts precision pen #03 in black
Adhesive
Paper Trimmer

Here are a few photos of the contents of the kit:


Hope to see you there.

Evaluate Your Life Day

Today is "Evaluate Your Life Day" so take a moment to reflect.

Monday, October 18, 2010

HAPPY NATIONAL CHOCOLATE CUPCAKE DAY

Today is national chocolate cupcake day, so go celebrate and have a chocolate cupcake!!!

October 31st

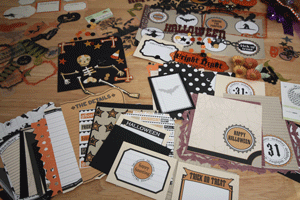
Here's some photos of the contents of the Halloween kit that we'll be teaching:

Front cover - using our exclusive album that has been laser cut.

Contents of the kit:


The flowers in this photo are made using the Cuttlebug quilling die, so we'll be showing you how to make these in class.


Sunday, October 17, 2010

Happy Halloween

It's been a while since I last posted.  Sorry about that.  Barry & I just got back from a European vacation.  We went to Barcelona, Spain for a couple of days, spent a week in Mykonos, Greece with Cocoa Daisy for their scrapbooking event, and then took a 12 day Mediterranean cruise.  It was fabulous and I'll post some photos later.

Now that we are home, Halloween is fast approaching.  I haven't had a chance to put up any decorations yet, but I'll have to get busy soon or we'll have some disappointed trick-or-treators this year.  We had our first Halloween in this house last year and everyone (well almost everyone) loved our decorations.  One little guy got as far as the sidewalk leading to our door and then took off running back to his parents on the sidewalk.  I felt so bad that I followed him out and made sure he got extra candy.

Amy & I will be teaching a Halloween mini album class at The Scrapbook Garden in Huntington Beach, CA next Saturday - October 23rd from 10AM - 1PM.  The cost is $35 and as all our mini album kits, it is packed full.  You will have lots of product left over to make cards or use for any scrapbook pages.  The retail value of the kit is well over $40.


Notice the little quilled flowers peeking out on the above page?  We'll be making those in class.   And as is usual with our kits, all the paper is pre-cut and organized in the order you will be using it.  So come and join us (or call and order a kit from the store) and make your album.  (If you aren't local to the area, I'll update this blog after the class and let you know if there are any remaining kits.  Then if you want to order one, you can order from our online store.)  That way all you have to do is drop in your photos and journaling after the big night.  And you can be sure we'll have some "frightful" treats to keep your sugar level up while creating.  Hope to see you there.

In addition to your regular Scrapbooking tool kit, please be sure to bring the following supplies with you to class:

Glossy Accents
Scissors
Trimmer
Journaling Pen
Tape Runner
Wet Adhesive (Glue)
Crop a Dile or hole punch
Photo mats (cut from white copy paper) in the following quantity and sizes:
     3x3 - 5
     4x4 - 3
     3x5 - 3
     4 1/2 x 4 1/2 - 1


Tuesday, August 10, 2010

Away We Go

Amy & I will be teaching our next class at The Scrapbook Garden on August 28th from 10 AM - 1 PM.  (You can use the link on the right to get the phone number and call and reserve your spot in class.)

Away We Go by Amy Sotolongo and Sally Basiliere

$35.10 plus $2.90 sales tax equalling $38
ONLY SIXTEEN KITS ARE AVAILABLE
(Retail value of this kit is over $36.00)
Come join us for a lovely scrapbooking class titled "Away We Go". It's a travel album just waiting for all our travel photos from this summer or before. It is also great if you have a trip in the works as you can take it along with you and journal right in the book! You will build the backbone of your book in class and then take it home and add all your photos and memorabilia! This kit is packed full of wonderful product including the entire Teresa Collins Travel line, bling, American Crafts Thickers, die cut borders and more! With over 30 physical pages and 60+ layouts on those pages you will have plenty of room to house all of your treasured vacation photos. As always yummy treats, laughs and fun will be provided. Come spend the morning with us!

I'll post more teaser photos next week.


Sunday, August 1, 2010

Wedding Album / Rolled flowers tutorial

We've loaded the wedding album to our store site (http://www.dareyousayit.com/).  There are only 2 remaining so if you want one, please don't delay in ordering it.

Someone that bought the kit only (didn't attend our class) asked how to make the flowers on the front of the album.  It's the same rolled flower that you've see elsewhere.  (I would give credit to the first place I saw these done, but I can't remember where that is since they are popping up everywhere.)  I told her that I would post a tutorial here.  Please bear with me as this is the first time I've posted anything like this.  If you have any suggestions / helpful advise, please leave me a comment.

1)  Pull out the paper for the flowers and the template. 
2)  Adhere the pattern to the paper with temporary adhesive.

2)  Using scissors (I used 2 decorative and 1 regular pair), cut around the spiral following the lines.  Be sure to leave some of the center portion uncut.
3)  Remove the pattern and start rolling the flower.  I start rolling and then place the paper between my index finger and thumb and turn to roll.
4)  Once you have it all rolled, your will release it to let it "bloom".  This is scary to some people, but trust me it will be fine.
5)  Next place a generous dollap of glue on the part of the flower that you did not cut.  Push the flower onto that glue and hold for a few moments to make sure it adheres.

6)  Allow the flower to dry.  (I usually wait at least 30 minutes to make sure the glue set.)  Spritz the top of your flower with just water - just enough to make it damp and pliable.  Then gently begin folding down the edges of the flower.
7)  Now you have a beautiful flower.  I then spritzed mine with Maya Road Mist - Iridescent Pearl - to give it a little shimmer.
Hope this helps.